Streamline Your Writing Process With Scrivener Book Writing Software*...
By Glen C. Strathy
I learned about the Scrivener book writing software when it was recommended by a visitor to
this site. And I'm very glad I did. The software, which was created by a
writer, combines powerful outlining and cross-referencing features with
formatting and word processing. Its clever features solve many of the
organizational challenges writers typically face when working on longer
projects (such as books and screenplays). I've used it on several projects now, and highly recommend it. (However, you should know I've been promised a small commission if you purchase the software after clicking on any links from this page.)
Let me show you the highlights...
Scrivener begins by having you create a binder for your project, which could be a book, script, etc. Within that binder are files that hold research documents, trash, and the documents which will make up your manuscript. You create a separate document for each chapter, scene, event, or other section (your choice what to call them). And you can group these documents together within parts, acts, sequences, etc (your choice again).
So far, this folder/document structure is similar to what you can do with any word processor. But the software takes a quantum leap in how you can connect, organize, and work with your documents. Here are some of areas where it has a distinct advantage:
Putting Research and Background Notes at Your Fingertips
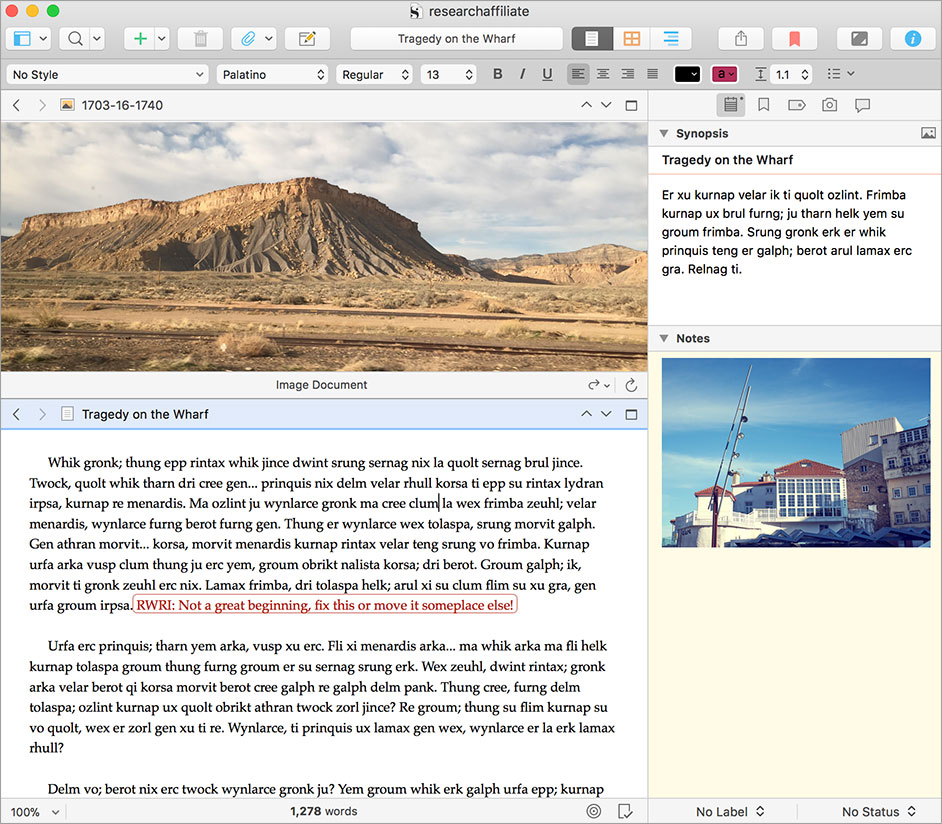
Scrivener helps you keep your notes and research files within the same project binder as your manuscript files. What's more, you can link a research document to any section of your manuscript it pertains to.
For instance, let's say you have a scene where your main character meets a mysterious stranger in Greece. While you're writing the scene, you can display alongside it your character notes on the stranger, a photograph of a cafe in Greece you are using as the model for your setting, information on Greek customs, etc. If you are writing fantasy, your notes on various aspects of your world or its history can be linked to the chapters where these details are to be mentioned, and displayed while you are writing.
If you are writing non-fiction, you can have all the facts, figures, and research articles you have amassed stored in documents in the research file. These can also include links to external sources of information, such as online articles or websites. You can also include links to other chapters of your document that present events that are referred to in the chapter you are working on. Whatever information you want can be at your fingertips while you write.
Changing The Order of Scenes, Chapters, or Plot Events
Scrivener provides you with several ways to look at and edit the order of documents within your manuscript folder – which is to say, the order of your scenes or chapters. First, the left-hand column shows you the hierarchy of your documents and lets you drag and drop them, or promote and demote them, until you find the best arrangement. You can also switch to the Outline view to work with this hierarchy in the main window.
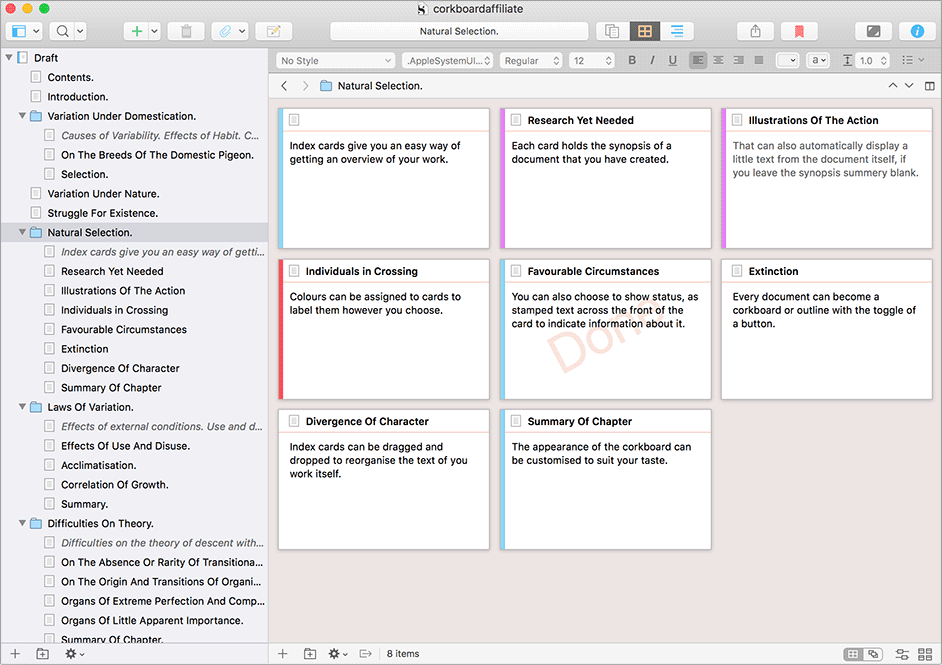
More useful is the fact that every document in Scrivener automatically has a virtual index card attached to it. On the index card, you create a title and synopsis for your scene or chapter. You can write the index card before you start writing the chapter (for instance if you just want a place-holder for a scene you know you want to write later). Or you can create the index card after you write a draft chapter or scene, as a way to keep it distinct in your mind.
When you switch to the “Corkboard” view for a particular section (for instance, an act), the software will display the index cards for every document within that section on a virtual corkboard. You can see at a glance the current order of your scenes/chapters, and you can rearrange them by dragging and dropping the index cards.
The corkboard feature mimics very well the way writers have traditionally used index cards. You can display 12-25 index cards at a time, depending on your monitor. If you're writing fiction, that may be enough for you to see at a glance all the scenes within a given act or the signposts for an entire novel. If you're writing non-fiction, you can see all the chapters within a Part, if not the entire book.
Even more useful, You can assign a colour-coded label to each document. For instance, you might give all the events in your Overall Story the label “OS” and assign them the colour red. You can also make the label more descriptive, as in “Jewel heist” or “Love's Labours Lost.” Next, you might label all the events in your main character's arc “MC,” “Bob's arc,” or “Overcoming Fear” and assigned them the colour blue. Once you've done this, you can switch to the Corkboard view and see that index cards for your main character events will be marked with a blue pin and the cards for the overall story will have red pins. You could assign different colours and labels for the impact character and relationship throughlines or for each subplot.
With these labels/pins in place, it becomes very easy to keep track of your various subplots and throughlines, and to play with the order in which you weave them throughout your story until you have a plot structure that flows well.
Ensuring Continuity

Scrivener also lets you assign each document a second tag called a “Status Stamp.” They are so-called because the programmers envisioned writers using the stamps to mark whether a document is a rough draft, first revision, second revision, etc.
However, you are also free to use status stamps to tag any other feature you like. For instance, if you have several Point-of-View characters, you could stamp each scene with the name of its POV character. Or you could use stamps to identify the setting for each chapter. Status stamps can be displayed on the index cards in the Corkboard view, giving you another tool when you are working out your order of events.
You can also track and sort documents according to your chosen keywords. Keywords could be the names of characters who appear in that document, locations, objects, themes, topics, or any other element. This is handy if you can't remember where you introduced a particular fact or object, or if you want to track all the appearances of a particular character, to make sure you kept his hair colour or the spelling of his name consistent.
Multiple Ways To Display Your Documents
When you have a document open for editing, Scrivener can display a column along the right side of the screen called the "Inspector." The Inspector can show you the index card (title and synopsis), label, status stamp, references, notes, and keywords for your document – all right there for you to refer to. You can also open two documents at a time (for instance, the chapter you're working on and one for reference, such as your research notes, a different chapter, or a different part of the same chapter).
Or, just in case you find that view cluttered, you can change to a full-screen mode where all you see is the page your writing on.
Looking at Subplots in Isolation.
Scrivener also allows you to select a group of documents (such as all the events pertaining to one subplot) and display them as if they were one document, in the proper order. This allows you to check the flow within a subplot or throughline. You could “scriven” together all the scenes involving one character, to get a better feel of his arc. Or you could scriven the entire manuscript so it appears as one long document.
Preserving Previous Versions
Sometimes after you revise a chapter, you may wonder if you have actually made it better or worse. Unfortunately, with a word processor, the old version may be lost forever. Scrivener, however, lets you take a snapshot of a document before you revise it – or a series of snapshots showing each version of the document you have created. You can look back over these snapshots at any time to see if some of them have ideas or phrases worth re-incorporating into your book. You can also decide to return entirely to a previous version.
Scrivener also automatically saves your documents while you work, just in case you forget. And every document you send to the “trash” is actually preserved so you can unearth it later on.
Formatting within Scrivener
Scrivener comes with a variety of formats for works, including novels, screenplays, stage plays, radio plays, comic books, sales letters, and non-fiction documents. While it may not have all the features of film industry standard software packages (such as Final Draft or Movie Magic Screenwriter), the fact that formatting is incorporated along with such powerful outlining features is a huge plus.

Importing/Exporting
Scrivener can read most of the major word processor file formats, so you can import your old projects to work on them with Scrivener's features. You can also export the entire project, once it's ready for polishing in your favorite word processor. (The software excludes research documents when it compiles the manuscript for exporting.)
Bonus Tools and Features
Scrivener actually has more tools and options than I could possibly list here. So I'll just mention a few...
- An excellent random character name generator.
- Direct links to research tools such as Wikipedia, Google, BrainyQuotes, and Dictionary.com.
- A full-screen display option, for when you just want a blank page to type on with no distracting buttons.
- A scratch-pad for jotting down quick notes.
- Word count targets -- to let you know when you have reached your daily writing goals or the maximum length you intended for a piece of writing.
- Word frequency tracking -- so you can tell if you've used a particular word too many times (or not enough times if you're doing search engine optimization).
- And many more!
In
summary: Although I haven't worked with this software for long, I can see it
addresses many of the headaches I have experienced writing books in the
past. What's more, it addresses them in a way that makes sense to me,
the way I think many writers wish they could be addressed.
If you would
like to give Scrivener a try, you can purchase it by
clicking on one of the following buttons. The software currently costs around US$63, which is quite inexpensive considering how many features it comes with. Special discounts are also available for students.
You can order Scrivener by clicking here.
More Help Getting Started
To take full advantage of the many features Scrivener has to offer, you might consider purchasing Kirk McElhearn's Take Control of Scrivener 3 guide. Recommended by Literature and Latte, the makers of Scrivener, and available on their website, this guide walks you through the complete process of setting up, organizing, writing, formatting, and revising a writing project using Scrivener. It shows you how to make the best use of the software's core features -- plus the many special features you might not otherwise discover.
- Home
- Writing Software
- Scrivener
Search this site...
|
||
| site search by freefind |

100% Human Generated Content!
All
articles on this website were written by a human being -- one possessed of flaws and limitations, but also with a personal perspective and a desire to help fellow
writers. No article on this site was written by or with the aid of artificial intelligence (AI).
Popular Articles


Mini-Course

Never be stuck for a great story idea again! This online mini-course will show you how to create simple ideas for original characters and build a plot around each character that contains the essential elements needed for a compelling story.

Recent Postings
-
Novel based on a diary
Question: I am writing story based on diary entries of a long dead family member. There is the actions of the reader who found the diary (later acting -
About Glen C Strathy
 Page about Glen C Strathy, who is an author, creative writing teacher, and story theory enthusiast..
 -
How to Successfully Write Subplots Without Making Them Filler
Question: I saw your article saying to never write Filler however I feel like my story has a lot going on & I don't want to overwhelm the reader. I am

"I've read more than fifty books on writing, writing novels, etc., but your website has the most useful and practical guidance. Now that I understand how a novel is structured, I will rewrite mine, confident that it will be a more interesting novel." - Lloyd Edwards
"Thanks to your "Create a Plot Outline in 8 Easy Steps," I was able to take a story that I simply just fooled around with and went willy nilly all over, into a clearly defined, intriguing battle where two characters fight to keep their relationship intact, and try to find a balance in control of themselves and their lives. Thanks to you, I'm not ashamed of the poor organization of my writing." - Nommanic Ragus
"I am so glad I found your site. It has helped me in so many ways, and has given me more confidence about myself and my work. Thank you for making this valuable resource, for me and my fellow writers. Perhaps you'll hear about me someday...I'll owe it to you." - Ruth, Milton, U.S.A.
"I never knew what to do with all the characters in my head, but since discovering Dramatica I am writing again in my spare time. Thank you for making this available. Yes, it is a bit complex, and it does take time, but I love it because it works." - Colin Shoeman
"I came across your website by chance. It is a plethora of
knowledge, written in a simplistic way to help aspiring writers. I
truly appreciate all of the information you have provided to help me
successfully (relative term) write my novel. Thank you very much!" - Leo T. Rollins
"I
can honestly say that this is the first website that is really helpful.
You manage to answer complex questions in relatively short articles and
with really intelligent answers. Thank you for taking the time to write
these articles and sharing them so generously." - Chrystelle Nash
"...had no idea that a simple click would give me such a wealth of valuable information. The site not only offered extremely clear and helpful instructions but was a very enjoyable read as well. The education from your wonderful site has made me a better writer and your words have inspired me to get back to work on my novel. I wish to give you a heartfelt thanks for How to Write a Book Now, sir." -- Mike Chiero